Saturday, October 29, 2011

Grilled BBQ Chicken Skewers

Prep: 20-30 minutes (depending on how much help you have) Grill: 10-30 minutes (depending on how many skewers you have)

1 pkg of boneless chicken breast or tenders
1 Red, Orange & Yellow Bell Pepepr
1 Jar of Dole Pinapple Chunks
1-2 Zuchinni Squash
1 pkg Whole Mushrooms
1 bottle Zesty Italian Dressing
1 bottle BBQ sauce
About 50 Bamboo Skewers - soaked in water for 30 minutes to prevent stick from burning on the grill.

These pieces are a little large.
They could probably be cut in half.
Drain pineapple juice from the jar of pineapples into a medium bowl.  Add bottle of dressing and bbq sause & mix with a wire wisk, set aside. Slice up chicken into bite size cubes.  Slice bell peppers & zuchinni squash into bite size pieces. Slice mushrooms in half. Put each of my veggies and chicken in their own bowls so when I am ready to skewer, I can grab what I need without digging for them; seperate bowls also makes it easier if you have others helping you skewer. 
Red, Orange & Yellow Bell Peppers are
sweeter than the traditional
green bell pepper.

Start skewering to where you are alternating between veggie & meat.  Place skewered meat & veggies into a large deep cake pan or turkey roaster. Once you have a layer of skewers, pour some of your bbq sauce mix onto the skewers. Continue layering & covering each layer with bbq sauce mix.


Cover pan(s) & refrigerate over night to marinate.

Place on medium heat grill for 10-15 minutes, rotating them about half way through. Skewers are cooked when you break one of the chicken pieces in half & it is not raw in the middle.  Discard leftover sauce that has touched the raw meat, since it may have picked up bacteria from the raw meat. 

I had many extra veggies after I finished skewering the meat so I sealed them in foil with a little butter, salt & pepper. Roasted them on the grill along with my skewers. It may be really hard, but refrain from eatting the veggies before they are cooked since you may have touched them with your hands that might have had raw chicken on them. 

I didn't have a chance to get a picture of them after they were cooked.  These are so good, I went straight to eating them & I was not thinking of pictures...

Squirt Butt Chicken

Many years ago on a camping trip, my Sister was in charge of dinner one night.  She brough her marinated beer butt chickens to cook on the open campfire.  Boy, was it GOOD! She even gave me one of the stands for me to make my own whenever I wanted to! (LOVE MY SIS!) But, alas I had to buy another stand because there was just no sense in cooking one when you can do two and have leftovers!  I'm not a fan of beer, I don't seen any sense in buying a 6pk of beer when I would only use 2 of the cans.  So I bought a 12pk of Squirt.  That way I can drink the rest at my leisure.  Of course, the first time I tried it, I asked my partner to bring home 2 chickens on her way home from work. Sure enough she brought me 2 turkeys, which worked out great figuring since I don't really like turkey.

2 - 5 to 8 lb chickens or turkeys
2 - cans of squirt (any soda would work since the liquid never touches the chicken)
olive oil or butter
3 tbls Garlic & Herb Grill Seasoning
1 tsp Sea Salt
1 tsp Fresh Ground Pepper
1.5 tbls Pollio Seasoning
2 tbls Whole Black Pepercorns
Cooking Spray
Large Turkey Roaster Pan
2 Beer Butt Chicken Stands

Thaw out the chicken according to the package directions.  Discard the neck and gizzards.  I ran the chickens under water to clean the off.  Pat dry with a paper towel. Line the turkey pan with foil for easier cleanup.  Mix in a small bowl the garlic & herb seasoning, pollio seasoning, salt & pepper.  Spray the stands with cooking spray. Open 2 cans of soda and drink about half of each & place cans in stands.  Place about a tablespoon of whole black peppercorns in each can & set cans inside of turkey roaster pan.  Pour a little olive oil on the inside the chickens & rub all around, even under the skin in places you can get to.  Grab some seasoning mix and rub all on the inside of the chickens.  Place the chickens on the stands through the chickens' rear end. Pour a little olive oil on the outside of the chickens. Use the rest of the seasoning mix & rub all over the outside of the chickens.  You can never have too much seasoning on these birds. Arange the legs & arms to make it look like they are sitting.  Fold over the neck skin so that it covers the neck hole & secure with a toothpick.  Marinate for an hour or two.

With help, place into a preheated 375 degree oven and cook until the meat temperature reads 180 degrees which is about 1 to 1 1/2 hours. When fnished cooking, let sit for about 10 minutes so the juices can settle. 

You can also substitue any of the seasonings with what you are used to using for your chickens.

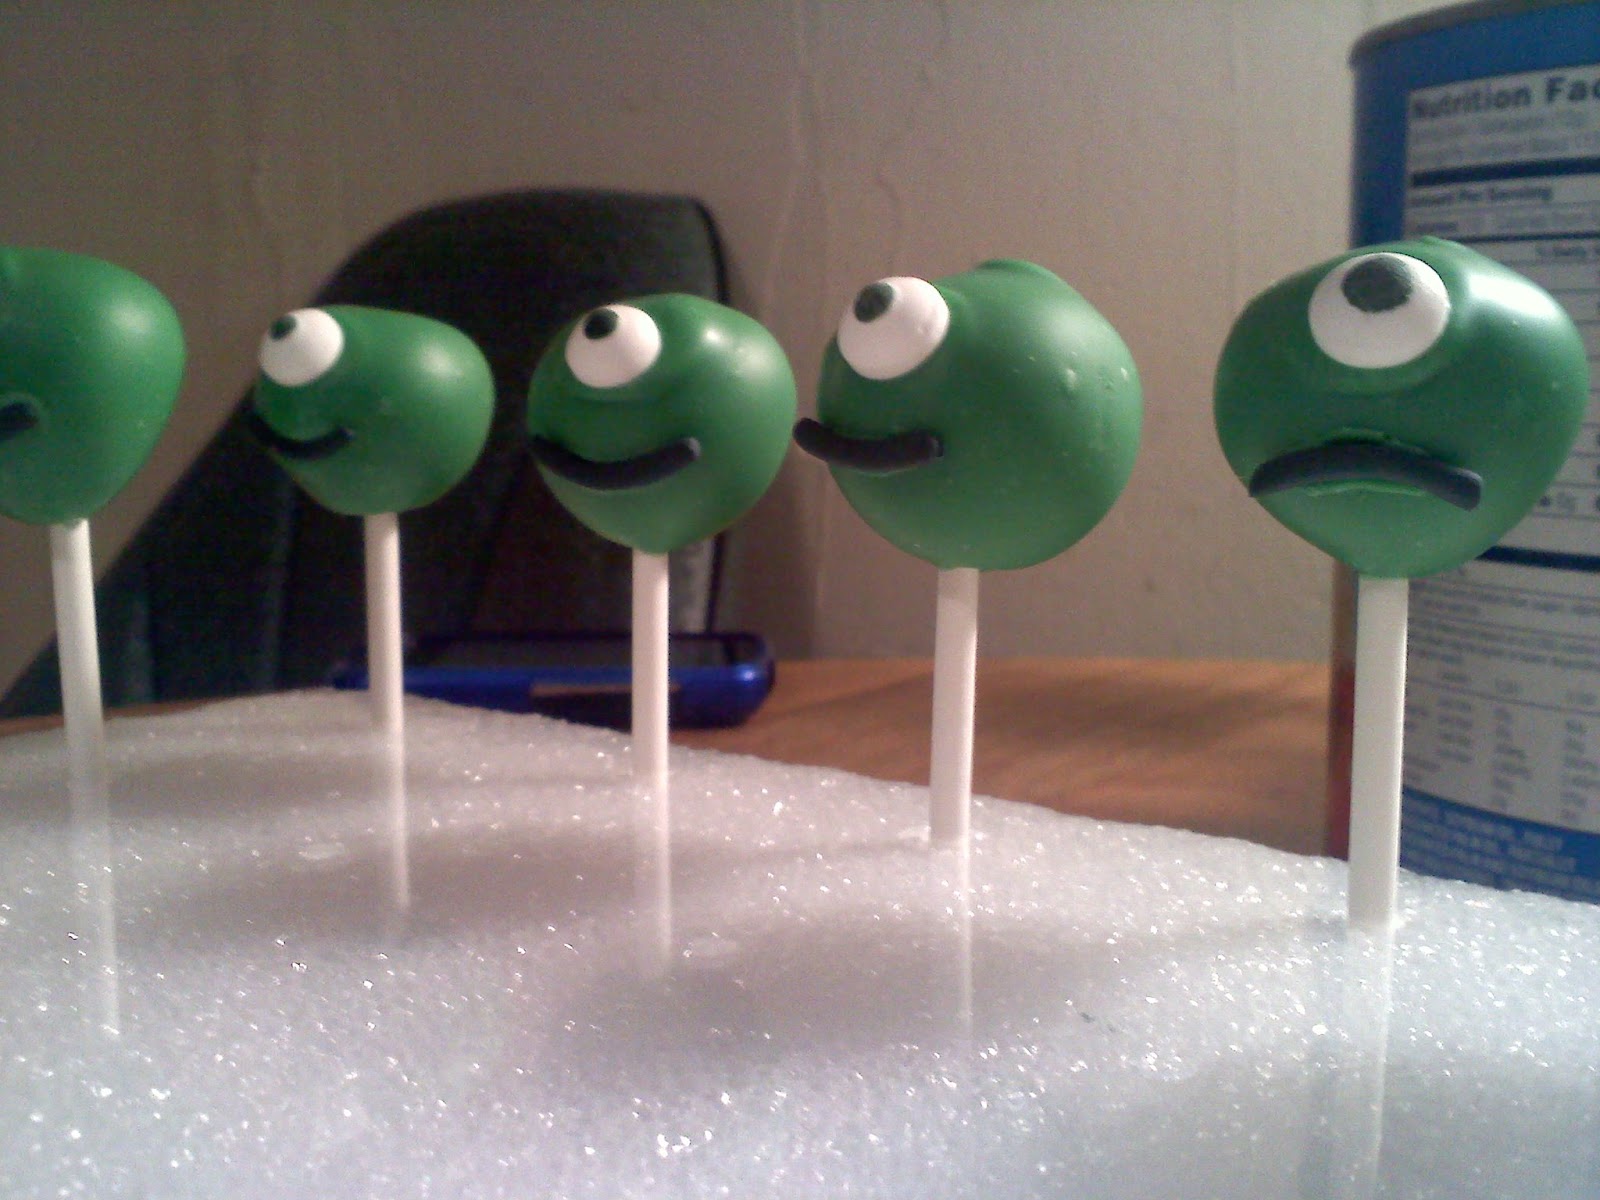
Scary Cake Pops

I was invited to a Halloween Party & I wanted to take something 'scary'.  I found some pretty interesting cake pops through pinterest but I had to combine quite a few methods to make my cake pops work & taste like I wanted them to. 

1 cake box mix
Jar of cake icing
Candy Melts
Sucker Sticks
Sugar Gum Paste
Candy Eyes
Gel Food Coloring
Shortening
Flower Foam board & half ball
Wax Paper

Bake the cake according to the directions on the box.  Once the cake is cooled, break off pieces of cake and crumble between your hands into a large bowl.  Add 1/2 of the jar of cake icing & mix well.  Cover bowl & refridgerate cake/icing mix for about 20 minutes.  Cover a cookie sheet with wax paper. Using a small spoon, scoop out the amount of cake/icing to wish to have your balls sized to & place on wax paper. Using a sucker stick, poke a hole the top of each of the balls.  In a small bowl, melt a small amount of candy melts; enough to dip a sucker stick into and place into the holes on the tops of each of the balls.  It doesn't really matter the amount because you can use that same candy melt later when you dip the cake pops.  Freeze the cakeballs for atleast 2 hours. 

For the Pumpkins, I used spice cake mix & cream cheese icing.  I used a whole jar of icing and I found that the cake balls were too sweet & too gooey for me.  Rolling the cake into the balls was messy.  For the Monsters, I used Chocolate cake mix & Chocolate Buttercream icing.  I used 1/2 of the icing and the cake balls came out tasting like brownies, which I like a lot more. Rolling the cake into balls was a lot cleaner.

For my pumpkins & monsters, I used sugar gum paste to make the pumpkin leaves & swirls & the mouths of the monsters.  This can be done days before or the day of.  I used a gel food coloring to tint my sugar gum paste to the color I wanted.  I bent wire to make my 'leaf' cutter. Rolled out the sugar gum paste flat and started cutting.  I used the round part on the end of a fork to make my leaf print.  I rolled out sugar gum paste into a long spaghetti like strand, cut it into small sections & swirled it to look like vine. I left my designed sugar gum paste out on wax paper to dry. (I suppose you could use the sugar gum paste while it is still moist, but I didn't want to risk having my colors run or blending with the candy melts or bending the sugar gum paste while I was trying to place them on/in the candy melt.  Leftover sugar gum paste can be stored in the freezer for years.

Once your cake pops are frozen, melt candy melts according to the package directions.  (I found a deep bowl worked best, for when I was getting low on my candy melt, I was able to tilt the bowl to where I had a corner to pool the candy melt.)  I added crisco(amount depends on the amount of candy melt you use) to thin the candy melt out & microwaved the candy melt on defrost for 30 seconds, stiring in between each 30 sec. interval. Since I noticed the candy melt was still too thick (it didn't pour off my stiring spoon as easy as I wanted it to) I added a little more crisco.  If you try to dip your cake pop into the candy melt and the cake falls off the sucker stick, then your candy melt is still too thick.  I kept a pair of chopsticks handy incase one fell off into the candy melt & I needed to 'rescue' it. If the candy melt was working fine for a bit & suddenly stops working as well, you probably need to microwave the candy melt again.

I tried to use gel food coloring to try to change the candy melt & I do not reccomend it. When I added it, my candy melt 'froze' up and it was no longer any good.  Change the colors of the candy melt by adding & mixing difference colors of candy melt.

Make a plan before you start. Once you dip your cake pops into the candy melt, depending on how you want the outcome to be; place cake pop directly onto a wax papered cookie sheet or stick the sucker stick into the flower foam to hold.

My pumpkins, I left on a cookie sheet; my monsters, I stuck into the foam.  If you are using decorative sugar gum paste and/or candy eyes - it is best if you stick to the gum paste before the candy melt 'cools'. But if you do it too soon, the leaves/vines/eyes/mouths will slide right off your pop.  I had help when making mine.  I dipped the cake pops & my partner placed the leaves/vines/eyes/mouths.  The cooling happens within 10-20 seconds.  Leftover candy melt can be saved. I poured my leftover candy melt into freezer ziploc baggies to save.

I wanted to have a cool & scary display for my hard worked cake pops.  I went to a local craft/quilt store & the lady happened to have an old apple basket in the back she sold to me for $2.  I purchased some material to cover my half ball & board of flower foam.  My selection of material prints was small, so I used a black rag I purchased to cover the material to make it look better.

I placed the green half ball where I wanted it on the white foam board after I cut it to size.  Covered it with my material and placed it in the basket to where it was wedged/hoving in the basket. I draped my black rag over the ball, foam & basket to give it a spidery look. I used a utility knife to make a slit through the material covering the half ball in the spots where I was going to place my cake pops.  I cut a piece of wax paper to the size of space I was placing the pumpkins in so that the cake pops wouldn't pick up any fuz from the black rag material. 

The Halloween Party Hostess was really pleased with it & took a picture for me.  

Friday, October 28, 2011

Apple Cinnamon Pecan Pull Apart Bread


Dough
2 tsp active dry yeast
1 1/3 cup of warm water
2 tbl olive oil
1 tsp salt
3 tsp sugar
3 1/2 c flour

Carmelized Apples
2 - 2 1/2 c apples (peeled, cored & diced: I liked larger chunks)
1/4 c butter
7 tbl dark brown sugar (doesn't have to be dark)
1 tsp ground cinnamon
1/2 c pecans (or nuts of your choice) (optional)
sprinkle of nutmeg (optional)

Glaze (optional)*
1 c powdered sugar
a tiny bit of milk

Pam Olive Oil Spray

In a large bowl, stir together yeast & water. Let sit for 5 minutes. While waiting, lightly oil/spray a medium bowl & set aside. Mix in the olive oil, salt, sugar, & flour. If you have a stand mixer, knead with the dough hook for 5-6 minutes or until elastic. If by hand, knead dough on a slightly floured surface unril dough is elastic, 7-10 minutes. Dough will be sticky but keep flouring the table as you knead. Place in oiled bowl & cover with oiled plastic wrap so that when the dough rises it will not stick to plastic. Allow to rise until it is doubled in size. I set mine in the sun & it was quick! 1 to 2 hours depending on the temperature.

In the mean time, prepare the apples. Place diced apples in a medium sauce pan with butter, brown sugar, cinnamon, & nutmeg. You can add the nuts at this point or layer them in when you layer with the apples & dough balls. Cook apples on medium heat until apples are cooked down & a sauce is formed. Remove sauce pan from heat & let cool until dough is ready.


Punch down the dough (I wasn't quite sure what it meant, so I gave it one good punch & the dough went flat). Grease/spray bundt pan. In the bottom of the pan, add a layer of nuts & apples with 1/4 of the sauce (you need to save half the sauce for dipping dough balls in & 1/4 for another layer). Tear off a small piece of dough about half the size of your thumb. Roll a quick ball, coat it in the sauce, place in the bottom of the bundt pan. Repeat until you have one layer of dough balls. Add a layer of apples, some sauce, & nuts. Continue with layering the dough balls. If you have sauce & apples remaining, just add to the top of the last layer.
Cover with plastic wrap & let rise until doubled in size, about 20 minutes.
Preheat oven to 300•
Now when I made it the first time, it said to cook @ 350 for 25-30 minuts or golden brown. I cooked it for 25 minutes & it was no where near getting brown. When I pulled it out of the oven, the outside was really hard! (That's why it worked so well with my soup)


Maybe it was my oven, not sure. I couldnt tell you how long I cooked it the second time, because I didn't time it. So, I checked it after about 10-15 minutes, if I could feel the top crust was becoming hard, when I pushed on it, it sprang back, it didn't stay pushed in, I knew it was done.
Mix the glaze while the bread is cooking in the oven. Add powdered sugar to a small bowl. Add a tinny smidget of milk. Mix. If it is really thick & not like slow moving molasses, it could use a smidget more milk. If it is too watery, add more powder sugar. Glaze should be somewhat runny, to slooowly run down the side of the warm bread but not too runny it doesn't stay on the bread.
Flip cooked bread in bundt pan onto a tray or plate & remove pan. Drizzle with glaze. Pull. Eat.


*3/26/2013: the last two times I have made this, I didnt use the glaze. Instead I made a cream cheese mix that was even better. I used one block of cream cheese, one cup of powdered sugar and about ½ c. milk. I mixed with a hand mixer or the KitchenAid, the cream cheese and the powdered sugar while slowly addung the milk. You only want enough milk to make the mixture slightly runny. Mix until no lumps are left and it is fluffy.


Easy Grilled Garlic & Herb Squash

Prep: 5-10min. Grill: 5-10min. Yields: 2-3 servings

2 Yellow Squash
2 Zuchinni Squash
Webers Roasted Garlic & Herb Seasoning (or your favorite grill seasoning)
Olive Oil
Charcoal or Gas Grill

Prepare atleast 15 minutes before grill is ready. Slice cleaned squash lenght wise (so it doesn't fall through grill) about a quarter inch thick. Lightly drizzle with olive oil. Lightly sprinkle with seasoning. On medium to high heat, grill each side of the squash for 3-4 minutes.

Paco's Coleslaw Revisited

I've been tweaking my coleslaw recipe over the years. My most recent switch/addition is to get rid of the milk and put heavy cream in its place. Oh yeah! I just love the creamy result.

Prep – 5 min. Refrigerate – at least an hour to set.

Half to a whole head of green cabbage
1 whole carrot
half onion finely diced
1/3 c. sugar
¼ tsp salt
pinch of pepper
¼ c. heavy cream
¾ c. mayonnaise
½ tsp garlic powder
1 Tbs white vinegar

Directions
1)   In a small non-metal bowl, mix the sugar, salt, pepper, heavy cream, mayo, garlic and vinegar. Mix with a non metal utensil until blended. Set aside.
2)   Mayo/Milk mixture sets, finely slice the cabbage. Grate the carrot, dice the onion. 
3)   In a large non-metal bowl, add the cabbage, carrots, and onion. Pour mayo/milk mixture over the cabbage. Mix well. Let sit for at least 30 minutes while you finish prepping the rest of your meal.

Feel free to add in red cabbage or any other veggies or fruit you would like. 
Others I have tried:
Broccoli
Mushrooms
Cucumbers

One suggestion from a friend: Pineapple. Will be trying it next!

Super Moist Pumpkin Cake with Cream Cheese Icing

I found a recipe online for pumpkin cake but I always make changes to suit me.  :)  The original called for 2 cups of pumpkin but I didn’t want to have leftover pumpkin so I just put it all in and decreased the amount of oil.  I also added in the nutmeg.  I made some changes to the icing too. :)

Prep time: 15 min. Oven cook time: 30 min.
Preheat Oven @ 350°

2 c. flour
3 tsp baking powder
2 tsp baking soda
¼ tsp salt
2 tsp ground cinnamon
1 tsp nutmeg
2 c. sugar
¾ c. vegetable oil
1 tsp vanilla extract
29oz canned pumpkin
4 eggs
1 c. chopped walnuts (optional)

Directions
1)   Grease a 9x13in and 8x9in pan.  In a medium bowl, stir together flour, baking powder, baking soda, salt, cinnamon and nutmeg.  Set aside.  I made two so that I would have one to freeze for later. :)
2)   In a large bowl, combine sugar and oil.  Blend in vanilla and pumpkin, and then beat in eggs for 2 minutes with electric mixer.  Gradually beat in flour mixture.  Stir in nuts.  Spread batter into pans. 
3)   Bake in oven for 30 minutes, or until a toothpick inserted into the center of the cake comes out ALMOST clean. I don’t bake a cake to where to toothpick comes out clean.  I take the cake out of the oven right before and in the cooling process, the cake finishes itself and the cake is moist.  Cool before icing.  Refrigerate leftovers.

Cream Cheese Icing

 ¾ c. margarine or butter
16oz Philadelphia cream cheese (2 boxes)
4 c. powdered sugar
2 tsp vanilla extract

Directions
1)   Beat softened butter and cream cheese until well blended.
2)   Add powdered sugar and vanilla.  Beat until creamy.

Leftover icing freezes very well, not lumpy/grainy like I thought it would be.  I tried once with Philadelphia name brand cream cheese and once with off-brand cream cheese and I found that I liked the Philly better.  The off brand made out to be gummier… egh.